در این مقاله از سری آموزش های برنامه نویسی اندروید می خواهیم ساخت کوییز آنلاین در اندروید استودیو را به صورت مرحله مرحله به شما آموزش دهیم تا بتوانید با آن بازی سوالی ، سوالات چهارگزینه ای، آزمونهای آنلاین و خلاصه هر چیزی که مربوط به آن می شود را در اندروید درست کنید. پس با سری آموزش های برنامه نویسی اندروید الکامکو همراه باشید.
ساخت کوییز آنلاین در اندروید استودیو چه کاربردی دارد؟
سورس ساخت کوییز آنلاین در اندروید استودیو را در کمتر سایتهای ایرانی می توانید پیدا کنید چون کاملا تخصصی است و بابت آموزش کامل آن از شما هزینه ای دریافت می کنند. ولی من بنا به درخواست مکرر کاربران سایت، در این مقاله سورس ساخت کوییز آنلاین در اندروید استودیو (Online Quiz) را به صورت کاملا حرفه ای به شما آموزش می دهیم.
برای شمایی که در حال حاضر این مطلب را می خوانید و آشنایی با این موضوع ندارید و یا در حال آموزش برنامه نویسی اندروید استودیو هستید شاید برایتان سوال پیش آید که ساخت آزمون گیر در اندروید استودیو چه کاربردی دارد؟
- ساخت مسابقه سوالی آنلاین در اندروید ( مثل: مسابقات اطلاعات عمومی، مسابقات پیش بینی فوتبال و… )
- ساخت بازی سوالی آنلاین در اندروید ( مثل: بازی اندروید آفتابه، بازی اندروید آمیرزا، بازی اندروید باقلوا و… )
- ساخت سوالات چهار گزینه ای آنلاین در اندروید ( مثل: اپلیکیشن های اندروید آموزشی ، اپلیکیشن های موبایل کنکوری و… )
مرحله اول سورس ساخت کوییز آنلاین در اندروید استودیو :
یک پروژه جدید در اندروید استودیو ایجاد می کنیم (من نام پروژه را QuizApp گذاشتم) . فرض کنید یک تست آزمون زبان انگلیسی داریم که شامل ۳۰ تا سوال چهار گزینه ای است. من می خواهم برای راحتی کارم سوالات آزمون و جواب هاش رو در یک فایل جیسون ایجاد کنم. این کار را می توانید درون ++notepad یا حتی خود نوت پد ویندوز انجام دهید و در نهایت فایل رو با پسوند json ذخیره کنید. سوالات چهار گزینه ای آزمون انلاین من به صورت زیر هست و نامش رو questions.json گذاشتم . دقت کنید که پسوند فایل حتما باید جیسون باشه .
[
  {
    "question": "1.‘Good morning everybody.’",
    "options": [
      "‘Goodbye.’",
      "‘Hi.’",
      "‘Take care.’",
      "‘See you tomorrow.’"
    ],
    "answer": 1
  },
  {
  "question": "2. ‘What do you do?’",
    "options": [
      "Not bad.",
      "She is a banker.",
      "You’re welcome.",
      "I’m an athlete."
    ],
    "answer": 3
  },
  {
  "question": "3. The …………………… is selling a lot of flowers today.",
    "options": [
      "florist",
      "gardener",
      "actor",
      "architect"
    ],
    "answer": 0
  },
  {
  "question": "4. I’d like to be a/an ……………… and work in the laboratory.",
    "options": [
      "writer",
      "engineer",
      "scientist",
      "chef"
    ],
    "answer": 2
  },
  {
  "question": "5. ‘How is it going?",
    "options": [
      " ‘Good evening.’",
      " ‘You’re welcome.’",
      "‘See you later.’",
      "‘Great.’"
    ],
    "answer": 3
  },
  {
  "question": "6. ‘How do you spell your last name?’",
    "options": [
      "‘You’re welcome.’",
      "‘P-O-R-T.’",
      " ‘Sorry.’",
      "‘Me too.’"
    ],
    "answer": 1
  },
  {
  "question": "7. A/An …………… designs the plan of a house.",
    "options": [
      "photographer",
      "doctor",
      "architect",
      "engineer"
    ],
    "answer": 2
  },
  {
  "question": "8. A/an ………….. works in a restaurant.",
    "options": [
      "hairdresser",
      "gardener",
      "electrician",
      "waiter"
    ],
    "answer": 3
  },
  {
  "question": "9. Singers and …………………. usually work with music.",
    "options": [
      "musicians",
      "actors",
      "writers",
      "managers"
    ],
    "answer": 0
  },
  {
  "question": "10. This pen doesn’t write well. Can I have ……………. one please.",
    "options": [
      "more",
      "with",
      "where",
      "another"
    ],
    "answer": 3
  },
  {
  "question": "11. ‘Where is she?’  ‘………………….. .’",
    "options": [
      "She is right over here.",
      "She works at the bank.",
      "on Mondays.",
      "in the morning"
    ],
    "answer": 0
  },
  {
  "question": "12. ‘Take care.’   ‘………………… ..’",
    "options": [
      "Good morning",
      "Good afternoon",
      "Good bye",
      "me too"
    ],
    "answer": 2
  },
  {
  "question": "13. ‘ Thank you.’  ‘………………….. . ‘",
    "options": [
      "Take care",
      "You’re welcome",
      "Great",
      "Good evening"
    ],
    "answer": 1
  },
  {
  "question": "14.  …………………… can I have another glass of water please?",
    "options": [
      "Excuse me.",
      "Thank you.",
      "You’re welcome.",
      "Nice to meet you."
    ],
    "answer": 0
  },
  {
  "question": "15. I called the office and the ……………….. answered the phone.",
    "options": [
      "electrician",
      "professor",
      "flight attendant",
      "secretary"
    ],
    "answer": 3
  },
  {
  "question": "16. My sisters live in Thailand. …………….doctors.",
    "options": [
      "She is",
      "They are",
      "My sisters",
      "My sisters is"
    ],
    "answer": 1
  },
  {
  "question": "17. New York ………………..in England. ……………………in America.",
    "options": [
      "are/ It is",
      "'s/ It’s",
      "is/ It’s not",
      "isn’t/ It is"
    ],
    "answer": 3
  },
  {
  "question": "18. My sister is a scientist. ……………………thirty years old.",
    "options": [
      "She’s",
      "They’re",
      "He is",
      "He’s"
    ],
    "answer": 0
  },
  {
  "question": "19. …………………..seven o’clock. ………………are late.",
    "options": [
      "It is/ Sara",
      "It / They",
      "It’s/ We",
      "It’s/  She "
    ],
    "answer": 2
  },
  {
  "question": "20. Look at the time. Mike and Sarah ………………….late.",
    "options": [
      "am",
      "is",
      "are",
      "'re"
    ],
    "answer": 2
  },
  {
  "question": "21.  ‘Are you Spanish’  ‘Yes. ……………………… .’",
    "options": [
      "they are",
      "she is",
      "I’m",
      "we are"
    ],
    "answer": 3
  },
  {
  "question": "22.  ‘ How ……………….. are you?’ ‘I’m seven.’",
    "options": [
      "from",
      "many",
      "old",
      "is everything"
    ],
    "answer": 2
  },
  {
  "question": "23. What  ………………… your address?",
    "options": [
      "am",
      "is",
      "are",
      "'re"
    ],
    "answer": 1
  },
  {
  "question": "24. They ……………. from London.",
    "options": [
      "am",
      "is",
      "are",
      "'s"
    ],
    "answer": 2
  },
  {
  "question": "25. They are ……………… and work in this hospital.",
    "options": [
      "doctor",
      "doctors",
      "scientist",
      "scientists’"
    ],
    "answer": 1
  },
  {
  "question": "26. ‘ Can you introduce yourself?’  ‘ Sure, my name is ……………… . ‘",
    "options": [
      "Michael grant",
      "michael Grant",
      "A Michael grant",
      "Michael Grant"
    ],
    "answer": 3
  },
  {
  "question": "27. ‘Where do you live?’   ‘ I live in ………………….. .’",
    "options": [
      "New York",
      "New york",
      "new York",
      "newYork"
    ],
    "answer": 0
  },
  {
  "question": "28. My friend ……………. just a teenager.",
    "options": [
      "am",
      "is",
      "are",
      "'re"
    ],
    "answer": 1
  },
  {
  "question": "29. ‘ What do you do sir?’  ‘ I’m a ……………. .’",
    "options": [
      "Teacher",
      "teachers",
      "teacher",
      "Teachers"
    ],
    "answer": 2
  },
  {
  "question": "30. ‘ What is your occupations?’ ‘ We are …………………… .’",
    "options": [
      "nurses'",
      "nurse",
      "a nurse",
      "nurses"
    ],
    "answer": 3
  }
]
مرحله دوم سورس ساخت کوییز آنلاین در اندروید استودیو :
آیکون های مورد نیاز را به پروژه اضافه می کنیم. در پایین همین مقاله کل پروژه رو برای دانلود قرار دادم که می توانید فایل هایی را که نیاز دارید از تو پروژه بردارید. در فولدر values یه فایل xml به نام dimens ایجاد می کنیم . فایل های درون فولدر values رو طبق سورسی که گذاشتم مقدار دهی کنید و همچنین یه سری فایل xml برای استایل دهی دکمه ها و همچنین انیمیشن ها درون فولدر drawable هست که آنها را کپی کنید تو پروژه خودتون. یه فولدر assets ایجاد کرده و فایل جیسون رو که حاوی سوالات هست درون اون می گذاریم . من اینجا اسم فایل جیسون رو questions.json گذاشتم .
مرحله سوم سورس ساخت کوییز آنلاین در اندروید :
لی اوت اصلی یا همون activity_main.xml رو به صورت زیر طراحی می کنیم . شما می توانید رنگ ها و آیکون ها و یا سایز دکمه ها رو با سلیقه خودتون تغییر بدید. دقت کنید که قبل از طراحی حتما فایل های پوشه res رو در پروژتون قرار بدید. (پروژه اصلی پایین این صفحه برای دانلود قرار داره)
<?xml version="1.0" encoding="utf-8"?>
<RelativeLayout
    xmlns:android="http://schemas.android.com/apk/res/android"
    xmlns:tools="http://schemas.android.com/tools"
    android:layout_width="match_parent"
    android:layout_height="match_parent"
    tools:context=".MainActivity">

    <RelativeLayout
        android:background="#fff"
        android:id="@+id/rel_main_toolbar"
        android:layout_width="match_parent"
        android:layout_height="65dp">

        <ImageView
            android:id="@+id/imageView_main_pointIcon"
            android:layout_width="60dp"
            android:layout_height="60dp"
            android:layout_alignParentRight="true"
            android:layout_centerVertical="true"
            android:layout_marginRight="16dp"
            android:src="@drawable/cup"/>

        <TextView
            android:id="@+id/textView_main_point"
            android:layout_width="wrap_content"
            android:layout_height="wrap_content"
            android:textColor="#000000"
            android:textSize="20dp"
            android:layout_centerVertical="true"
            android:layout_marginRight="8dp"
            android:layout_toLeftOf="@id/imageView_main_pointIcon"
            android:text="0"
            tools:text="30"/>

        <ImageView
            android:id="@+id/imageView_main_timer"
            android:layout_width="60dp"
            android:layout_height="60dp"
            android:layout_centerVertical="true"
            android:src="@drawable/alarm"
            android:layout_marginLeft="16dp"
            android:layout_alignParentLeft="true" />

        <TextView
            android:id="@+id/textView_main_remainingTime"
            android:layout_width="wrap_content"
            android:layout_height="wrap_content"
            android:textColor="@color/green"
            android:textSize="20dp"
            android:layout_marginLeft="8dp"
            android:layout_centerVertical="true"
            android:layout_toRightOf="@id/imageView_main_timer"
            tools:text="10:00"/>

    </RelativeLayout>

    <LinearLayout
        android:weightSum="5"
        android:layout_below="@id/rel_main_toolbar"
        android:background="@color/colorPrimary"
        android:orientation="vertical"
        android:layout_width="match_parent"
        android:layout_height="match_parent">

        <TextView
            android:id="@+id/textView_main_question"
            android:layout_width="match_parent"
            android:layout_height="wrap_content"
            android:paddingRight="8dp"
            android:paddingLeft="8dp"
            android:textSize="16sp"
            android:layout_margin="10dp"
            android:minLines="6"
            android:maxLines="6"
            android:fontFamily="serif"
            android:textColor="@android:color/white"
            android:gravity="center_vertical|left"
            tools:text="1.‘Good morning everybody.’"/>

        <TextView
            android:id="@+id/button_main_answer_0"
            android:layout_width="match_parent"
            android:layout_height="0dp"
            android:layout_weight="1"
            android:layout_marginBottom="16dp"
            android:layout_marginRight="40dp"
            android:layout_marginLeft="40dp"
            android:textColor="#000000"
            android:textSize="14sp"
            android:gravity="center"
            android:fontFamily="serif"
            android:background="@drawable/background_option_button"/>

        <TextView
            android:id="@+id/button_main_answer_1"
            android:layout_width="match_parent"
            android:layout_height="0dp"
            android:layout_weight="1"
            android:layout_marginBottom="16dp"
            android:layout_marginRight="40dp"
            android:layout_marginLeft="40dp"
            android:textColor="#000000"
            android:textSize="14sp"
            android:gravity="center"
            android:fontFamily="serif"
            android:background="@drawable/background_option_button"/>

        <TextView
            android:id="@+id/button_main_answer_2"
            android:layout_width="match_parent"
            android:layout_height="0dp"
            android:layout_weight="1"
            android:layout_marginBottom="16dp"
            android:layout_marginRight="40dp"
            android:layout_marginLeft="40dp"
            android:textColor="#000000"
            android:textSize="14sp"
            android:gravity="center"
            android:fontFamily="serif"
            android:background="@drawable/background_option_button"/>

        <TextView
            android:id="@+id/button_main_answer_3"
            android:layout_width="match_parent"
            android:layout_height="0dp"
            android:layout_weight="1"
            android:layout_marginBottom="16dp"
            android:layout_marginRight="40dp"
            android:layout_marginLeft="40dp"
            android:textColor="#000000"
            android:textSize="14sp"
            android:gravity="center"
            android:fontFamily="serif"
            android:background="@drawable/background_option_button"/>

    </LinearLayout>

</RelativeLayout>
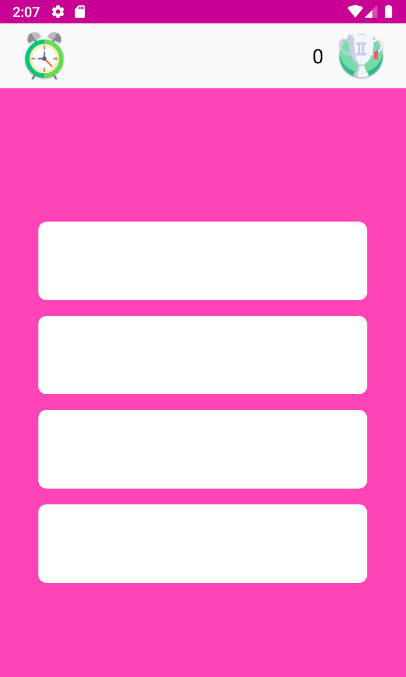
تا اینجای کار خروجی برنامه به شکل زیر هست :
حال یک دیتامدل برای ساخت کوییز آنلاین در اندروید ایجاد می کنیم . یک کلاس با نام Question ایجاد کرده و مانند زیر کدنویسی می کنیم :
package com.elecomco.quizapp;

import java.util.ArrayList;
import java.util.List;

public class Question {

    private String question;
    private int answer;
    private List<String> options=new ArrayList<>();

    public String getQuestion() {
        return question;
    }

    public void setQuestion(String question) {
        this.question = question;
    }

    public int getAnswer() {
        return answer;
    }

    public void setAnswer(int answer) {
        this.answer = answer;
    }

    public List<String> getOptions() {
        return options;
    }

    public void setOptions(List<String> options) {
        this.options = options;
    }

}
همانطور که می بینید این دیتامدل شامل یک رشته با نام question است که سوال مربوطه می باشد . یک عدد صحیح با نام answer که شماره جواب تست می باشد و همچنین یک لیست از رشته ها با نام options که حاوی سوالات چهار گزینه ای آنلاین در اندروید استودیو است .
حالا به کلاسی احتیاج داریم که سوالات را به صورت تصادفی از مجموعه تست های ۴ گزینه ای ما بیرون بکشد. در واقع این کلاس مجموعه سوالات آنلاین ما را مدیریت کند . کلاسی را ایجاد کرده با نام QuestionManager که کدهای آن به صورت زیر است :
package com.elecomco.quizapp;

import android.content.Context;
import android.util.Log;
import org.json.JSONArray;
import org.json.JSONException;
import org.json.JSONObject;
import java.io.IOException;
import java.io.InputStream;
import java.util.ArrayList;
import java.util.List;

public class QuestionManager {

    private static final String TAG = "QuestionManager";
    private List<Question> questions=new ArrayList<>();

    public boolean finishAnswer=false;

    public QuestionManager(Context context){
        try {
            InputStream inputStream=context.getAssets().open("questions.json");
            String json=null;
            int size=inputStream.available();
            byte[] buffer=new byte[size];
            inputStream.read(buffer);
            inputStream.close();
            json=new String(buffer,"UTF-8");
            parseJson(json);
        } catch (IOException e) {
            Log.e(TAG, "QuestionManager: "+e.toString() );
        }
    }

    private void parseJson(String json){
        try {
            JSONArray questionsJsonArray=new JSONArray(json);
            JSONObject questionJsonObject;
            for (int i = 0; i < questionsJsonArray.length(); i++) {
                questionJsonObject=questionsJsonArray.getJSONObject(i);
                Question question=new Question();
                question.setAnswer(questionJsonObject.getInt("answer"));
                question.setQuestion(questionJsonObject.getString("question"));
                List<String> options=new ArrayList<>();
                JSONArray optionsJsonArray=questionJsonObject.getJSONArray("options");
                for (int j = 0; j < optionsJsonArray.length(); j++) {
                    options.add(optionsJsonArray.getString(j));
                }
                question.setOptions(options);
                this.questions.add(question);
            }
        } catch (JSONException e) {
            e.printStackTrace();
        }
    }

    public Question getQuestion(){
        if (questions.isEmpty()) return null;

        int position=0;
        while (isAskedBefore(position)){
            position++;
        }
        askedQuestions.add(position);
        return questions.get(position);
    }

    private List<Integer> askedQuestions=new ArrayList<>();

    private boolean isAskedBefore(int position){
        if (askedQuestions.size()==questions.size()){
            askedQuestions.clear();
        }
        if (askedQuestions.size()==questions.size()-1){
            finishAnswer=true;
        }else {
            finishAnswer=false;
        }
        return askedQuestions.contains(position);
    }

}
این کلاس که با نام QuestionManager برای طراحی آزمون گیر در اندروید استودیو ایجاد شده شامل یک سازنده (Constractor) می باشد. ورودی این سازنده از نوع Context می باشد که برای دسترسی به پوشه assets در پروژه به کار برده می شود .
ما می خواهیم اطلاعات را از فایل questions.json خوانده و در لیستی از سوالات ( questions ) ذخیره کنیم . برای خواندن فایل از کلاس InputStream استفاده می کنیم . از آنجایی که برای باز کردن فایل ممکن است با خطا مواجه شویم برای جلوگیری از کرش کردن برنامه از ساختار try…catch استفاده میکنیم .
هر فایلی مجموعه ای از بایت ها می باشد. به همین دلیل فایل را به صورت آرایه ای از بایت ها خوانده و به بافر (حافظه موقت) منتقل کرده و در نهایت InputStream فایل را از درون بافر می خواند . توجه کنید که سایز باقر ایجاد شده باید دقیقا با سایز فایل برابر باشد.
یک تابع با نام parseJson ایجاد میکنیم که همانطور که از نامش پیداست، کارش parse کردن Json است . در واقع لیست سوالات را درون آرایه ای از جیسون قرار می دهیم . تابع getQuestion درون سوالات به صورت تصادفی یکی از سوالات را برمی گرداند، این کار از ابتدای سوالات تا پایان سوالات درون آرایه جستجو می شود . تابع isAskedBefore نیز برای جلوگیری از برگرداندن سوالات تکراری است .
مرحله چهارم سورس ساخت کوییز آنلاین در اندروید استودیو :
در این مرحله از ساخت آزمون گیر در اندروید استودیو باید ۳ دیالوگ مختلف طراحی کنیم. دیالوگ اول زمان آغاز باید نشان داده شود که حاوی یک دکمه شروع است که کاربر با کلیک بر روی آن وارد کوییز میشود . دیالوگ دوم بعد از پایان زمان مربوطه یا بعد از اتمام تست نشان داده می شود که حاوی بهترین زمان و بالاترین امتیاز نیز هست و همچنین دارای دکمه شروع دوباره نیز می باشد که کاربر با کلیک بر روی آن مجددا وارد کوییز می شود . دیالوگ سوم برای زمانیست که کاربر در حین کوییز دکمه بک را کلیک می کند و ما توسط این دیالوگ اخطاری را به وی نشان می دهیم و به او یادآوری می کنیم که در صورت خروج ، نتیجه تست ذخیره نمی گردد. ابتدا دکمه استارت را به صورت زیر طراحی می کنیم (راست کلیک روی layout و ایجاد یک فایل xml با نام start_btn) :
<?xml version="1.0" encoding="utf-8"?>
<merge
    xmlns:android="http://schemas.android.com/apk/res/android"
    android:layout_width="wrap_content"
    android:layout_height="wrap_content">

    <View
        android:id="@+id/view_start_btn"
        android:layout_width="match_parent"
        android:layout_height="match_parent"
        android:layout_margin="16dp"
        android:background="@drawable/bg_anim_start_btn"/>
    <Button
        android:id="@+id/button_start_btn"
        android:layout_width="match_parent"
        android:layout_height="match_parent"
        android:text="Start"
        android:textColor="@android:color/white"
        android:layout_margin="16dp"
        android:background="@drawable/bg_start_btn"/>

</merge>
یک کلاس جاوا با نام StartBtn ایجاد میکنیم . این کلاس برای ایجاد انیمیشن روی دکمه شروع میباشد . در واقع کدنویسی که در زیر می بینید، به صورتی است که یک موج به صورت انیمیشنی روی دکمه ایجاد می کند. در اینجا ما به کمک فایل های start_btn.xml و StartBtn.java یک دکمه اختصاصی طراحی کرده ایم که یک موج به صورت انیمیشن اطراف این دکمه ایجاد شده است .
package com.elecomco.quizapp;

import android.content.Context;
import android.os.Build;
import android.support.annotation.AttrRes;
import android.support.annotation.NonNull;
import android.support.annotation.Nullable;
import android.support.annotation.RequiresApi;
import android.support.annotation.StyleRes;
import android.util.AttributeSet;
import android.view.LayoutInflater;
import android.view.View;
import android.view.animation.Animation;
import android.view.animation.ScaleAnimation;
import android.widget.Button;
import android.widget.FrameLayout;

public class StartBtn extends FrameLayout {

    private View animView;
    private Button startBtn;

    public StartBtn(@NonNull Context context) {
        super(context);
        setupViews();
    }

    public StartBtn(@NonNull Context context, @Nullable AttributeSet attrs) {
        super(context, attrs);
        setupViews();
    }

    public StartBtn(@NonNull Context context, @Nullable AttributeSet attrs, @AttrRes int defStyleAttr) {
        super(context, attrs, defStyleAttr);
        setupViews();
    }

    @RequiresApi(api = Build.VERSION_CODES.LOLLIPOP)
    public StartBtn(@NonNull Context context, @Nullable AttributeSet attrs, @AttrRes int defStyleAttr, @StyleRes int defStyleRes) {
        super(context, attrs, defStyleAttr, defStyleRes);
        setupViews();
    }

    public void setupViews(){
        LayoutInflater.from(getContext()).inflate(R.layout.start_btn,this,true);
        animView =findViewById(R.id.view_start_btn);
        startBtn =findViewById(R.id.button_start_btn);
    }

    @Override
    protected void onFinishInflate() {
        super.onFinishInflate();
        if (!isInEditMode()){
            ScaleAnimation scaleAnimation=new ScaleAnimation(1,1.2f,1,1.2f, Animation.RELATIVE_TO_SELF,0.5f,Animation.RELATIVE_TO_SELF,0.5f);
            scaleAnimation.setDuration(400);
            scaleAnimation.setRepeatCount(Animation.INFINITE);
            scaleAnimation.setRepeatMode(Animation.REVERSE);
            animView.startAnimation(scaleAnimation);
        }
    }

    @Override
    protected void onMeasure(int widthMeasureSpec, int heightMeasureSpec) {
        int size=getContext().getResources().getDimensionPixelSize(R.dimen.size_startButton);
        super.onMeasure(MeasureSpec.makeMeasureSpec(size,MeasureSpec.EXACTLY),
                MeasureSpec.makeMeasureSpec(size,MeasureSpec.EXACTLY));
    }

    public void setOnStartButtonClickListener(OnClickListener onClickListener){
        startBtn.setOnClickListener(onClickListener);
    }

}
حالا باید دیالوگ اول را که شامل دکمه استارت می باشد به صورت زیر طراحی کنیم. همچنین شامل دکمه خروج نیز می باشد. دیالوگ را به صورت سفارشی ایجاد می کنیم که دررون activity_main نمایش داده می شود. ابتدا یک فایل xml با نام result_dialog در پوشه لی اوت ایجاد کرده، کد های result_dialog.xml به صورت زیر می باشد و کدهای activity_main.xml نیز به شکلی که تمایش داده شده تغییر می کند:
result_dialog.xml
<?xml version="1.0" encoding="utf-8"?>
<FrameLayout
    xmlns:android="http://schemas.android.com/apk/res/android"
    xmlns:tools="http://schemas.android.com/tools"
    android:id="@+id/frame_resultDialog"
    android:layout_width="match_parent"
    android:layout_height="match_parent"
    android:visibility="gone"
    tools:visibility="visible"
    android:background="@color/colorPrimary">

    <LinearLayout
        android:layout_width="match_parent"
        android:layout_height="wrap_content"
        android:orientation="vertical"
        android:layout_gravity="center_vertical"
        android:gravity="center_horizontal">

        <TextView
            android:id="@+id/textView_gameResultDialog_message"
            android:layout_width="match_parent"
            android:layout_height="wrap_content"
            android:layout_marginBottom="8dp"
            android:textSize="20dp"
            android:padding="8dp"
            android:textColor="@android:color/white"
            tools:text="Not Bad"
            android:gravity="center"/>
        <LinearLayout

            android:layout_width="wrap_content"
            android:layout_height="wrap_content"
            android:layout_marginBottom="8dp"
            android:orientation="horizontal">

            <TextView
                android:id="@+id/txt_result_point"
                android:layout_width="wrap_content"
                android:layout_height="wrap_content"
                android:textColor="@android:color/white"
                android:textSize="60dp"
                tools:text="90"/>

            <TextView
                android:layout_width="wrap_content"
                android:layout_height="wrap_content"
                android:textColor="@android:color/white"
                android:textSize="14dp"
                tools:text="Points"/>
        </LinearLayout>

        <TextView
            android:id="@+id/txt_resultDialog_best"
            android:layout_width="wrap_content"
            android:layout_height="wrap_content"
            android:layout_marginBottom="60dp"
            android:textColor="@android:color/holo_orange_light"
            tools:text="Best Record : 100 points"/>

        <TextView
            android:layout_width="wrap_content"
            android:layout_height="wrap_content"
            android:textColor="@android:color/white"
            android:text="Do you want to start again?"/>

        <com.elecomco.quizapp.StartBtn
            android:id="@+id/startButton_gameResultDialog"
            android:layout_width="wrap_content"
            android:layout_height="wrap_content"/>

        <Button
            android:id="@+id/button_gameResultDialog_exit"
            android:layout_width="wrap_content"
            android:layout_height="wrap_content"
            android:textColor="@android:color/white"
            android:background="@drawable/bg_exit_btn"
            android:text="Exit"/>

    </LinearLayout>

</FrameLayout>
activity_main.xml
<?xml version="1.0" encoding="utf-8"?>
<RelativeLayout
    xmlns:android="http://schemas.android.com/apk/res/android"
    xmlns:tools="http://schemas.android.com/tools"
    android:layout_width="match_parent"
    android:layout_height="match_parent"
    tools:context=".MainActivity">

    <RelativeLayout
        android:background="#fff"
        android:id="@+id/rel_main_toolbar"
        android:layout_width="match_parent"
        android:layout_height="65dp">

        <ImageView
            android:id="@+id/imageView_main_pointIcon"
            android:layout_width="60dp"
            android:layout_height="60dp"
            android:layout_alignParentRight="true"
            android:layout_centerVertical="true"
            android:layout_marginRight="16dp"
            android:src="@drawable/cup"/>

        <TextView
            android:id="@+id/textView_main_point"
            android:layout_width="wrap_content"
            android:layout_height="wrap_content"
            android:textColor="#000000"
            android:textSize="20dp"
            android:layout_centerVertical="true"
            android:layout_marginRight="8dp"
            android:layout_toLeftOf="@id/imageView_main_pointIcon"
            android:text="0"
            tools:text="30"/>

        <ImageView
            android:id="@+id/imageView_main_timer"
            android:layout_width="60dp"
            android:layout_height="60dp"
            android:layout_centerVertical="true"
            android:src="@drawable/alarm"
            android:layout_marginLeft="16dp"
            android:layout_alignParentLeft="true" />

        <TextView
            android:id="@+id/textView_main_remainingTime"
            android:layout_width="wrap_content"
            android:layout_height="wrap_content"
            android:textColor="@color/green"
            android:textSize="20dp"
            android:layout_marginLeft="8dp"
            android:layout_centerVertical="true"
            android:layout_toRightOf="@id/imageView_main_timer"
            tools:text="10:00"/>

    </RelativeLayout>

    <LinearLayout
        android:weightSum="5"
        android:layout_below="@id/rel_main_toolbar"
        android:background="@color/colorPrimary"
        android:orientation="vertical"
        android:layout_width="match_parent"
        android:layout_height="match_parent">

        <TextView
            android:id="@+id/textView_main_question"
            android:layout_width="match_parent"
            android:layout_height="wrap_content"
            android:paddingRight="8dp"
            android:paddingLeft="8dp"
            android:textSize="16sp"
            android:layout_margin="10dp"
            android:minLines="6"
            android:maxLines="6"
            android:fontFamily="serif"
            android:textColor="@android:color/white"
            android:gravity="center_vertical|left"
            tools:text="1.‘Good morning everybody.’"/>

        <TextView
            android:id="@+id/button_main_answer_0"
            android:layout_width="match_parent"
            android:layout_height="0dp"
            android:layout_weight="1"
            android:layout_marginBottom="16dp"
            android:layout_marginRight="40dp"
            android:layout_marginLeft="40dp"
            android:textColor="#000000"
            android:textSize="14sp"
            android:gravity="center"
            android:fontFamily="serif"
            android:background="@drawable/bg_option_btn"/>

        <TextView
            android:id="@+id/button_main_answer_1"
            android:layout_width="match_parent"
            android:layout_height="0dp"
            android:layout_weight="1"
            android:layout_marginBottom="16dp"
            android:layout_marginRight="40dp"
            android:layout_marginLeft="40dp"
            android:textColor="#000000"
            android:textSize="14sp"
            android:gravity="center"
            android:fontFamily="serif"
            android:background="@drawable/bg_option_btn"/>

        <TextView
            android:id="@+id/button_main_answer_2"
            android:layout_width="match_parent"
            android:layout_height="0dp"
            android:layout_weight="1"
            android:layout_marginBottom="16dp"
            android:layout_marginRight="40dp"
            android:layout_marginLeft="40dp"
            android:textColor="#000000"
            android:textSize="14sp"
            android:gravity="center"
            android:fontFamily="serif"
            android:background="@drawable/bg_option_btn"/>

        <TextView
            android:id="@+id/button_main_answer_3"
            android:layout_width="match_parent"
            android:layout_height="0dp"
            android:layout_weight="1"
            android:layout_marginBottom="16dp"
            android:layout_marginRight="40dp"
            android:layout_marginLeft="40dp"
            android:textColor="#000000"
            android:textSize="14sp"
            android:gravity="center"
            android:fontFamily="serif"
            android:background="@drawable/bg_option_btn"/>

    </LinearLayout>

    <FrameLayout
        android:id="@+id/frame_main_startDialog"
        android:layout_width="match_parent"
        android:layout_height="match_parent"
        android:background="@color/colorPrimary"
        tools:visibility="gone">

        <LinearLayout
            android:layout_width="match_parent"
            android:layout_height="wrap_content"
            android:gravity="center_horizontal"
            android:orientation="vertical"
            android:layout_gravity="center_vertical">
            <TextView
                android:layout_width="wrap_content"
                android:layout_height="wrap_content"
                android:layout_marginBottom="8dp"
                android:textSize="20sp"
                android:textColor="@android:color/white"
                android:text="Ready To start ?"/>

            <com.elecomco.quizapp.StartBtn
                android:id="@+id/startButton_main"
                android:layout_width="wrap_content"
                android:layout_height="wrap_content"
                android:layout_marginBottom="8dp"
                android:layout_centerInParent="true"/>

            <Button
                android:id="@+id/button_main_exit"
                android:layout_width="wrap_content"
                android:layout_height="wrap_content"
                android:textColor="@android:color/white"
                android:background="@drawable/bg_exit_btn"
                android:text="Exit"/>

        </LinearLayout>

    </FrameLayout>

    <include
        layout="@layout/result_dialog"/>

</RelativeLayout>
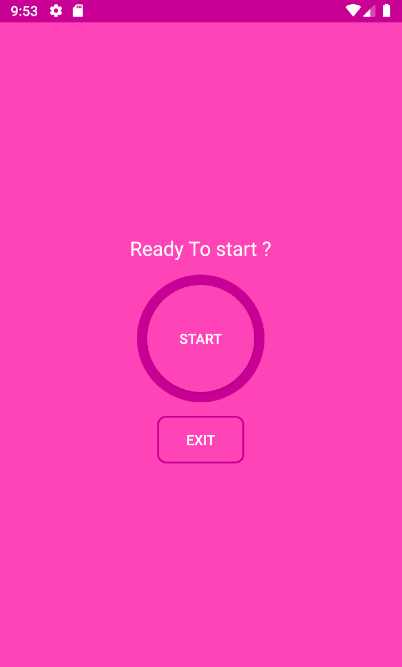
اگر برنامه را اجرا کنیم، خروجی به شکل زیر می باشد که می توانید انیمیشن ایجاد شده در اطراف دکمه اختصاصی را مشاهده کنید:
مرحله پنجم سورس ساخت کوییز آنلاین در اندروید استودیو :
در این مرحله از ساخت کوییز در اندروید استودیو باید کدهایی بنویسیم تا زمانیکه روی دکمه استارت کلیک می کنیم دیالوگ بسته شده و کوییز شروع شود. MainActivity را باز کرده و به صورت زیر کدنویسی می کنیم:
package com.elecomco.quizapp;

import android.support.v7.app.AppCompatActivity;
import android.os.Bundle;
import android.view.View;
import android.view.animation.AlphaAnimation;
import android.view.animation.Animation;
import android.widget.FrameLayout;

public class MainActivity extends AppCompatActivity {

    private FrameLayout getStartDialog;

    private QuestionManager questionManager;

    @Override
    protected void onCreate(Bundle savedInstanceState) {
        super.onCreate(savedInstanceState);
        setContentView(R.layout.activity_main);

        questionManager=new QuestionManager(this);

        setupViews();

    }

    private void setupViews() {

        getStartDialog=findViewById(R.id.frame_main_startDialog);

        final StartBtn startBtn=findViewById(R.id.startButton_main);
        startBtn.setOnStartButtonClickListener(new View.OnClickListener() {
            @Override
            public void onClick(View v) {
                AlphaAnimation alphaAnimation=new AlphaAnimation(1f,0f);
                alphaAnimation.setDuration(300);
                alphaAnimation.setAnimationListener(new Animation.AnimationListener() {
                    @Override
                    public void onAnimationStart(Animation animation) {

                    }

                    @Override
                    public void onAnimationEnd(Animation animation) {
                        getStartDialog.setVisibility(View.GONE);
                    }

                    @Override
                    public void onAnimationRepeat(Animation animation) {

                    }
                });

                getStartDialog.startAnimation(alphaAnimation);

            }
        });

    }
}
توسط تابع setupViews کد نویسی را به صورتی انجام می دهیم که دیالوگ به صورت انیمیشنی بسته شده و وارد صفحه سوالات چهار گزینه ای آنلاین در اندروید شویم. توجه کنید که ما تابع setOnStartButtonClickListener را قبلا در کلاس StartBtn ایجاد کرده بودیم و اکنون از آن استفاده کرده و رویداد کلیک را برای دکمه استارت ایجاد می کنیم .
حالا کلاسی را با نام PointsManager ایجاد کرده برای آنکه توسط SharedPreferences بالاترین امتیاز را ذخیره کنیم . این کلاس را به صورت زیر کدنویسی می کنیم:
package com.elecomco.quizapp;

import android.content.Context;
import android.content.SharedPreferences;

public class PointsManager {

    private SharedPreferences sharedPreferences;
    public PointsManager(Context context){
        sharedPreferences=context.getSharedPreferences("points",Context.MODE_PRIVATE);
    }

    public void savePoint(int point){
        String points=sharedPreferences.getString("points","");
        SharedPreferences.Editor editor=sharedPreferences.edit();
        if (!points.isEmpty()){
            editor.putString("points",points+","+String.valueOf(point));
        }else{
            editor.putString("points",String.valueOf(point));
        }
        editor.apply();
    }

    public int getBestRecord(){
        String points=sharedPreferences.getString("points","");
        int bestRecord=0;
        String[] pointsArray=points.split(",");
        for (int i = 0; i < pointsArray.length; i++) {
            int record=Integer.parseInt(pointsArray[i]);
            if (record>bestRecord){
                bestRecord=record;
            }
        }
        return bestRecord;
    }

}
مرحله ششم سورس ساخت کوییز آنلاین در اندروید استودیو (مرحله پایانی):
در این مرحله از سورس کد طراحی سوالات چهار گزینه ای در اندروید استودیو ، MainActivity را باز کرده و به صورت زیر کدنویسی می کنیم . در اینجا تمامی توابع مورد نیاز را می نویسیم و از کلاس های مورد نظر استفاده می کنیم . مدت زمان پاسخگویی به ۳۰ سوال را من در اینجا روی ۲ دقیقه (۱۲۰ هزار میلی ثانیه) تنظیم کرده ام و همیشه بالاترین امتیاز دریافتی شما ذخیره می گردد. شما اگر به ۳۰ سوال مربوطه پاسخ دهید و یا اگر مدت زمان شما تمام شود مجددا دیالوگ باز می شود و امتیاز شما و همچنین بالاترین امتیاز نمایش داده می شود. توضیحات کامل کدهای درون MainActivity حتما در انتهای همین مقاله، داده خواهد شد.
package com.elecomco.quizapp;

import android.media.MediaPlayer;
import android.os.Handler;
import android.support.v4.content.ContextCompat;
import android.support.v7.app.AppCompatActivity;
import android.os.Bundle;
import android.view.View;
import android.view.animation.AlphaAnimation;
import android.view.animation.Animation;
import android.widget.Button;
import android.widget.FrameLayout;
import android.widget.TextView;
import java.util.Locale;
import java.util.Timer;
import java.util.TimerTask;

public class MainActivity extends AppCompatActivity implements View.OnClickListener {

    private FrameLayout getStartDialog;

    private QuestionManager questionManager;

    private TextView questionTextView;
    private TextView option0Button;
    private TextView option1Button;
    private TextView option2Button;
    private TextView option3Button;
    private TextView pointTextView;
    private TextView remainingTimeTextView;
    private Question currentQuestion;
    private int point;
    private Timer timer;
    private int remainingTime=34000;
    private MediaPlayer mediaPlayer,mediaPlayer2,mediaPlayer3;
    private PointsManager pointsManager;

    @Override
    protected void onCreate(Bundle savedInstanceState) {
        super.onCreate(savedInstanceState);
        setContentView(R.layout.activity_main);

        mediaPlayer=MediaPlayer.create(this,R.raw.background_music);
        mediaPlayer2=MediaPlayer.create(this,R.raw.positive);
        mediaPlayer3=MediaPlayer.create(this,R.raw.wrong);
        timer=new Timer();

        questionManager=new QuestionManager(this);

        pointsManager=new PointsManager(this);

        setupViews();

    }

    private void setupViews() {

        getStartDialog=findViewById(R.id.frame_main_startDialog);
        questionTextView=findViewById(R.id.textView_main_question);
        pointTextView=findViewById(R.id.textView_main_point);
        remainingTimeTextView=findViewById(R.id.textView_main_remainingTime);
        Button exitButton=findViewById(R.id.button_main_exit);
        exitButton.setOnClickListener(new View.OnClickListener() {
            @Override
            public void onClick(View view) {
                finish();
            }
        });

        option0Button=findViewById(R.id.button_main_answer_0);
        option0Button.setTag(0);
        option0Button.setOnClickListener(this);

        option1Button=findViewById(R.id.button_main_answer_1);
        option1Button.setTag(1);
        option1Button.setOnClickListener(this);

        option2Button=findViewById(R.id.button_main_answer_2);
        option2Button.setTag(2);
        option2Button.setOnClickListener(this);

        option3Button=findViewById(R.id.button_main_answer_3);
        option3Button.setTag(3);
        option3Button.setOnClickListener(this);

        final StartBtn startBtn=findViewById(R.id.startButton_main);
        startBtn.setOnStartButtonClickListener(new View.OnClickListener() {
            @Override
            public void onClick(View v) {
                AlphaAnimation alphaAnimation=new AlphaAnimation(1f,0f);
                alphaAnimation.setDuration(300);
                alphaAnimation.setAnimationListener(new Animation.AnimationListener() {
                    @Override
                    public void onAnimationStart(Animation animation) {

                    }

                    @Override
                    public void onAnimationEnd(Animation animation) {
                        getStartDialog.setVisibility(View.GONE);
                        onGameStarted();
                    }

                    @Override
                    public void onAnimationRepeat(Animation animation) {

                    }
                });

                getStartDialog.startAnimation(alphaAnimation);

            }
        });

    }

    private void setPoint(int point){
        this.point=point;
        pointTextView.setText(String.valueOf(point));
    }

    private void loadNewQuestion(){
        currentQuestion=questionManager.getQuestion();
        questionTextView.setText(currentQuestion.getQuestion());
        option0Button.setText(currentQuestion.getOptions().get(0));
        option1Button.setText(currentQuestion.getOptions().get(1));
        option2Button.setText(currentQuestion.getOptions().get(2));
        option3Button.setText(currentQuestion.getOptions().get(3));
    }

    private void onGameStarted() {
        setPoint(0);
        mediaPlayer.start();
        remainingTime=121000;

        remainingTimeTextView.setText(formatTime(remainingTime));
        timer=new Timer();
        timer.schedule(new TimerTask() {
            @Override
            public void run() {
                runOnUiThread(new Runnable() {
                    @Override
                    public void run() {
                        remainingTime-=1000;
                        if (remainingTime<20000){
                            if (remainingTime<10000){
                                if (remainingTime<=0){
                                    onGameFinished();
                                }
                                remainingTimeTextView.setTextColor(ContextCompat.getColor(MainActivity.this,android.R.color.holo_red_light));
                            }else {
                                remainingTimeTextView.setTextColor(ContextCompat.getColor(MainActivity.this,android.R.color.holo_orange_light));
                            }
                        }else {
                            remainingTimeTextView.setTextColor(ContextCompat.getColor(MainActivity.this,R.color.green));
                        }
                        remainingTimeTextView.setText(formatTime(remainingTime));
                    }
                });
            }
        },۰,۱۰۰۰);
        loadNewQuestion();
    }

    private boolean isShowingSelectedOptionResult=false;
    @Override
    public void onClick(final View view) {

        if (questionManager.finishAnswer)
        {
            onGameFinished();
        }

        if (!isShowingSelectedOptionResult){
            int selectedOption= (int) view.getTag();
            if (selectedOption==currentQuestion.getAnswer()){
                view.setBackgroundResource(R.drawable.shape_correct_option);
                if (point<30){
                    setPoint(point+1);
                }

                mediaPlayer2.start();

            }else {
                view.setBackgroundResource(R.drawable.shape_wrong_option);
                mediaPlayer3.start();
            }
            isShowingSelectedOptionResult=true;
            new Handler().postDelayed(new Runnable() {
                @Override
                public void run() {
                    loadNewQuestion();
                    view.setBackgroundResource(R.drawable.bg_option_btn);
                    isShowingSelectedOptionResult=false;
                }
            },۵۰۰);
        }

    }

    private String formatTime(long duration) {
        int seconds = (int) (duration / 1000);
        int minutes = seconds / 60;
        seconds %= 60;
        return String.format(Locale.ENGLISH, "%02d", minutes) + ":" + String.format(Locale.ENGLISH, "%02d", seconds);
    }

    @Override
    protected void onDestroy() {
        super.onDestroy();
        timer.cancel();
        mediaPlayer.release();
        mediaPlayer2.release();
        mediaPlayer3.release();
    }

    private void onGameFinished(){
        pointsManager.savePoint(point);
        timer.cancel();
        mediaPlayer.seekTo(0);
        mediaPlayer.pause();
        mediaPlayer2.seekTo(0);
        mediaPlayer2.pause();
        mediaPlayer3.seekTo(0);
        mediaPlayer3.pause();
        showGameResult();
    }

    public void showGameResult(){
        final FrameLayout frameLayout=findViewById(R.id.frame_resultDialog);
        frameLayout.setVisibility(View.VISIBLE);
        AlphaAnimation alphaAnimation=new AlphaAnimation(0f,1f);
        alphaAnimation.setDuration(300);
        frameLayout.startAnimation(alphaAnimation);

        TextView resultMessageTextView=findViewById(R.id.textView_gameResultDialog_message);
        TextView resultPointTextView=findViewById(R.id.txt_result_point);
        TextView bestRecordTextView=findViewById(R.id.txt_resultDialog_best);

        Button exitButton=findViewById(R.id.button_gameResultDialog_exit);
        exitButton.setOnClickListener(new View.OnClickListener() {
            @Override
            public void onClick(View view) {
                finish();
            }
        });

        StartBtn startButton=findViewById(R.id.startButton_gameResultDialog);
        startButton.setOnStartButtonClickListener(new View.OnClickListener() {
            @Override
            public void onClick(View view) {
                frameLayout.setVisibility(View.GONE);
                onGameStarted();
            }
        });

        if (point>=28){
            resultMessageTextView.setText("Perfect!");
        }else if (point>=24){
            resultMessageTextView.setText("Good!");
        }else if (point>=15){
            resultMessageTextView.setText("Not Bad!");
        }else if (point>=0){
            resultMessageTextView.setText("Bad , Try Again");
        }

        resultPointTextView.setText(String.valueOf(point));
        bestRecordTextView.setText("Best Record : "+pointsManager.getBestRecord()+" Points");
    }

}
توضیحات کدهای پروژه ساخت کوییز آنلاین در اندروید :
( سورس ساخت بازی سوالی در اندروید به صورت آنلاین )
در تابع onCreate متغیرهایی را که از کلاس MediaPlayer ساخته ایم new می کنیم و آنها را مقدار دهی می کنیم. توجه کنید که فایل های صوتی در فولدر raw هستند . یکی از صداها هنگام ورود پخش میشود . یکی از آنها هنگام زدن پاسخ غلط و دیگری هنگام زدن پاسخ صحیح . همچنین متغیرهایی را که از کلاس های Timer ، QuestionManager و PointsManager ، ساخته بودیم new می کنیم.
حالا تابع setupViews را صدا می زنیم. در این تابع تمامی متغیرها و view ها مقدار دهی شده اند. برای دکمه های جواب ها از Tag استفاده کرده ایم که توسط یک تابع onClick بتوانیم برای آنها به تفکیک کد نویسی های مربوطه را انجام دهیم . تابع setPoint نیز امتیاز کاربر را درون TextView مربوطه نشان می دهد.
در تابه loadNewQuestion در پروژه ساخت کوییز انلاین در اندروید استودیو ، توسط کلاس QuestionManager هر بار که به سوال بعدی میرویم ، سوال و جواب های ۴ گزینه ای مربوطه را لود میکنیم . شما هر زمان که پاسخ میدهید به صورت اتوماتیک به سوال بعدی میروید . در تابع onGameStarted که برای شروع کوییز میباشد ، ابتدا امتیاز را صفر میکنیم . فایل صوتی انتخابی را پخش کرده و زمان کوییز را روی زمان مورد نظر که بر حسب میلی ثانیه است تنظیم میکنیم . من در اینجا زمان را روی ۱۲۱ هزار میلی ثانیه که معادل ۱۲۱ ثانیه یعنی ۲ دقیقه و ۱ ثانیه است تنظیم کرده ام . مدت زمان باقی مانده در remainingTime ذخیره میشود . من برای ۲۰ ثانیه آخر رنگ متن تایمر را به نارنجی و برای ۱۰ ثانیه آخر به قرمز تغییر داده ام . در این تابع همچنین تابع loadNewQuestion را برای لود شدن اولین سوال صدا میزنیم .
در تابع onClick که مربوط به دکمه های جواب ها (در اینجا من از TextView به جای Button استفاده کرده ام) میباشد ، وضعیت پاسخ دهی مشخص میشود . اگر کاربر پاسخ صحیح بدهید رنگ TextVie سبز شده و صوت مربوطه پخش میشود . در غیر اینصورت رنگ TextView , قرمز شده و صدای مربوط به پاسخ غلط پخش میشود . همچنین در پایان (پاسخ دادن به همگی سوالات یا اتمام وقت) تابع onGameFinished صدا زده میشود . تابع formatTime همانطور که از نامش پیداست زمان مورد نظر را بر حسب میلی ثانیه دریافت کرده و با محاسبات مربوطه فرمت آنرا به دقیقه و ثانیه تبدیل میکند . در تابع onDestroy نیز حتما باید timer را کنسل کرده و مدیا پلیر ها را ریلیز کنیم . این موارد همگی در دوره آموزش صفر تا صد برنامه نویسی اندروید آموزش داده شده اند .
در تابع onGameFinished ، تایمر را کنسل کرده، توسط pointsManager امتیاز را ذخیره می کنیم . مدیا پلیرها را به حالت اولیه برگردانده و تابع showGameResult را فراخوانی می کنیم . در تابع showGameResult ، صفحه دیالوگ دوباره باز می شود. با این تفاوت که در این دیالوگ امتیاز مربوطه و همچنین بالاترین امتیاز کاربر نمایش داده می شود. همچنین با توجه به امتیاز کاربر یک پیغام به او نشان داده می شود. با امید به اینکه مقاله آموزش ساخت کوییز آنلاین در اندروید استودیو مورد رضایت شما عزیزان قرار گرفته باشد.
الکامکو می تواند به شما در ارائه خدمات مشاوره توسعه برنامه های اندرویدی و همچنین آموزش برنامه نویسی اندروید کمک کند | پشتیبانی الکامکو
مقالات مرتبط:
- روش های کسب درآمد برنامه نویسی اندروید چگونه است؟
- برای داشتن شغل برنامه نویسی اندروید چه مهارتهایی باید داشته باشید؟
- دانلود فیلم های آموزش برنامه نویسی اندروید رایگان به زبان فارسی
- چگونه با گوشی برنامه نویسی کنیم؟ معرفی اپلیکیشن ها و ابزارها + لینک دانلود
- کدام زبان اندروید بعنوان جدیدترین، بهترین و قوی ترین زبان برنامه نویسی اندروید است؟
- بهترین محیط برنامه نویسی اندروید کدام است؟
- معرفی بهترین کتابخانه های اندروید استودیو که یک برنامه نویس باید بداند! + لینک دانلود
- معرفی بهترین شبیه سازهای اندروید جدید برای ویندوز کامپیوتر،لپ تاپ، بازی و برنامه نویسی + لینک دانلود
- آموزش و سورس ساخت کوییز آنلاین در اندروید استودیو مرحله به مرحله
- لانچر اندروید چیست؟ معرفی بهترین لانچر های اندروید برای گوشی
- رات اندروید چیست و چگونه اجرا می شود + معرفی بهترین ها برای ساخت رات اندروید
- دانلود جدیدترین نسخه برنامه اندروید استودیو برای ویندوز، مک و لینوکس
- آموزش ساخت اپلیکیشن خرید اینترنتی اندروید همراه با source پروژه
به دنبال یادگیری برنامهنویسی اندروید هستید؟
دوره های آموزش برنامهنویسی اندروید الکامکو با بهرهگیری از جدیدترین تکنولوژیهای برنامهنویسی، به شما این امکان را میدهد که به سرعت و به راحتی برنامههای اندرویدی خود را طراحی و توسعه دهید. با یادگیری برنامهنویسی اندروید، میتوانید به راحتی اپلیکیشنهایی را بسازید که به کاربران بسیاری کمک میکند و در عین حال به شما درآمدزایی میدهد.
همچنین، بعد از یادگیری برنامهنویسی اندروید، میتوانید به راحتی بازاریابی و فروش برنامههای خود را بر روی گوگل پلی و دیگر پلتفرمهای اندروید انجام دهید و درآمد خوبی را کسب کنید.
بخش های دوره آموزش ساخت برنامه اندروید با جاوا در اندروید استودیو
- بخش اول : مقدمه . آموزش جاوا
- بخش دوم : مفاهیم مقدماتی
- بخش سوم : آموزش کامل ریسایکر ویو (RecyclerView)
- بخش چهارم : مفاهیم کاربردی (قسمت اول)
- بخش پنجم : کار با دیتابیس و انواع فایل و ذخیره سازی در اندروید
- بخش ششم : مفاهیم کاربردی (قسمت دوم)
- بخش هفتم : آموزش کامل PHP
- بخش هشتم : آموزش HTML – CSS – Bootstrap
- بخش نهم : آموزش کامل کار با سرور در اندروید استودیو
- بخش دهم: مفاهیم تکمیلی
- بخش یازدهم : آموزش کامل کار با نقشه
- بخش دوازدهم : پروژه نهایی
- سرفصل های اندروید بصوت کامل
همچنین ببینید » همه دوره های برنامه نویسی جاوا اندروید
مقدمه و معرفی دوره آموزش کاتلین
- آشنایی با زبان کاتلین
- قوانین و مفاهیم پایه برای یادگیری زبان کاتلین
- مقایسه جاوا و کاتلین
- آموزش نصب و راه اندازی اندروید استودیو
- شروع کار با اندروید استودیو
- آشنایی اولیه با سیستم عامل Android
- بررسی ایمولیتور (شبیه ساز) و انواع آن
- ساخت ایمولیتور در اندروید استودیو
- شناخت ابزارهای برنامه نویسی Android
- انتخاب ابزار مناسب برنامه نویسی اندروید
- آشنایی با معماری سیستم عامل Android
- آموزش نصب نرم افزار های مورد نیاز جهت برنامه نویسی Android
- شروع طراحی در اندروید استودیو
- اجرای برنامه در شبیه ساز
- آموزش مفاهیم شی گرایی در برنامه نویسی (Object Oriented Programming)
- آموزش کامل برنامه نویسی با زبان کاتلین (kotlin)
- برای مشاهده ادامه سرفصلها روی دوره کلیک کنید
همچنین بخوانید » همه دوره های کاتلین | کتاب آموزش برنامه نویسی اندروید با کاتلین | flutter یا kotlin یاد بگیریم؟ | مقایسه جاوا (Java) و کاتلین (Kotlin)
دوره متخصص اندروید شامل دوره های جاوا و کاتلین می باشد. همچنین دارای ۷ دوره حرفه ای دیگر برای تبدیل شدن به یک متخصص اندروید کامل می باشد.
بخش های مختلف دوره جامع متخصص اندروید
- بخش اول : آموزش برنامه نویسی اندروید با جاوا
- بخش دوم : آموزش حرفه ای طراحی UI/UX در اندروید
- بخش سوم : آموزش زبان برنامه نویسی کاتلین از صفر تا صد و پروژه محور
- بخش چهارم : اندروید پلاس (آموزش مفاهیم ضروری در اندروید)
- بخش پنجم : آموزش جامع معماری MVP در اندروید با ساخت پروژه اپلیکیشن خبری فول امکانات
- بخش ششم : آموزش جامع معماری MVVM در اندروید با چندین پروژه حرفه ای
- بخش هفتم : آموزش ساخت بازی در اندروید استودیو
- بخش هشتم : آموزش پرداخت درون برنامه کافه بازار
- بخش نهم : آموزش ساخت اپلیکیشن فروشگاهی فول امکانات
بخش های دوره آموزش فلاتر
- بخش اول : آموزش برنامه نویسی به زبان دارت (Dart)
- بخش دوم : آموزش UI/UX – رابط کاربری و تجربه کاربری در فلاتر
- بخش سوم : مفاهیم کاربردی
- بخش چهارم : پیش نیاز بخش سرور
- بخش پنجم : آموزش کامل کار با سرور
- بخش ششم : مفاهیم پیشرفته
- بخش هفتم : مفاهیم تکمیلی
- بخش هشتم : طراحی و ساخت وبسایت فروشگاهی با فلاتر
- بخش نهم : طراحی و ساخت اپلیکیشن فروشگاهی با فلاتر
همچنین بخوانید » همه دوره های فلاتر | مقایسه فلاتر و ری اکت نیتیو | آینده فلاتر چگونه است؟ | کتاب آموزش فریمورک flutter | فیلم های آموزش فلاتر رایگان | نصب فلاتر | اموزش زبان دارت | ساخت اپلیکیشن اندروید و iOS | یادگیری فلاتر | پیش نیاز اندروید



































































































































































































سلام و خسته نباشید. یه پروژه مربوط به طراحی آزمون اندروید رو با این مطلب خوبتون تونستم درست کنم . مرسی
موفق باشید
عالی بود مهندس
خیلی بود مهندس دم شما گرم
محض اطلاعتون باید عرض کنم این آموزش برای کوییز آنلاین نیست و تمام اتفاقات داخل بازی به صورت آفلاین انجام میشه و کوییز آنلاین ساختش به مراتب سخت تر از سطح این آموزش هست. لطفا کلمه آنلاین رو از روی عنوان این تاپیک بردارید تا افراد رو به اشتباه نندازید
محض اطلاعت سوالات به فرمت جیسون هست و کافیه در دیتابیس سمت سرور ذخیره بشن و به سمت اندروید به صورت جیسون پاس داده بشن. سمت اندروید هم با لایبرری والی به راحتی گرفته میشن و ادامه کار ….
ما ماهی به کسی نمیدیم. ماهیگیری یاد میدیم
این دوره ساخت کوییز آنلاین رو خیلی حرفه ای درست کردید. نهایت استفاده رو ازش بردم . 🙂
خدا خیرتون بده برای این پروژه حرفه ای ساخت کوییز در اندروید استودیو و ممنون از اینکه رایگان بود. دوره صفر تا صد آموزش برنامه نویسی اندروید مهندس آزاد رو دیده بودم و عالی بود🌺💜
ای ول . دم شما گرم
آموزش ساخت کوییز در اندروید استودیو عالی بود . انجام دادم و لذت بردم . ممنون🌺